Saturday, February 25, 2012

Texas Caviar

WARNING - THIS DISH IS ADDICTIVE!

This is a family favorite and the most requested dish to bring to parties.  The best part is that it is so simple to make.  When I am at the store to get the ingredients to this I just remember that there are SIX ingredients plus the marinade and I usually have the ingredients to the marinade on hand.  Here is the Recipe!  It is a little sweet and and little spicy.

1 Can of Black Beans
1 Can of Shoepeg Corn (or white corn)
1 small jar of Pimentos
1 Can of Blackeyed Peas
1 Medium Red Onion (Chopped into small pieces)
1/2 cup to 3/4 cup of Pickled Jalapeno Peppers (chopped into small pieces)

Drain all ingredients into a colander, and then pour into a bowl with a lid.

Marinade


In a small sauce pan:

1 Cup of Sugar
1 Cup of White Vinegar
1/2 Cup of Olive Oil

Heat Marinade ingredients until sugar is melted.  Cool for a few minutes and pour over ingredients in your bowl with a lid, place the lid on the bowl and put in the fridge overnight or for at least 6-8 hours.

When you are ready to serve,  dump the whole concoction in your colander again to drain off the marinade, THIS IS VERY IMPORTANT! (I didn't do this the first time I made it, oopps! I didn't read the instructions). Pour into your serving bowl!  Serve with Scoops, or it can also be served as a side dish.

This is a great appetizer with scoops, I have one friend that just eats it with a spoon!

Enjoy!!

Thanks for looking,

Love your comments, keep them coming!

Partying at:


Funky Junk's Saturday Nite Special


Tuesday, February 21, 2012

Teal (End) Table - Boonville, IN Poison Table

Here is another great auction item that I purchased a few weeks ago.  My biggest fan was with me at the auction and we thought this little end table would work great in our sun room between our two lounging chairs.  We put it in the back of my XUV and brought it home.  When we opened up the back to get it out there was this horrible stench!  Ewwww! What was that smell?  I don't know, but this little puppy got banished to the great outdoors for a few days to air out.  I had just read on someone else's blog, sorry but I can't remember who's, that the cure for stinky furniture was to let it air out outside a few days, and if you have some sunshine that is even better.  It worked great, nary a smell too it now! Here is the before picture:
Airing that Puppy out!


I decided on a teal colored paint that I already had in my stash, the colors in my sun room are browns, oranges, tans, so I thought the teal would add a nice pop to the room, plus I already had it. Recently I had been stalking  looking through the Graphics Fairies Blog here and had been wanting to use one of her wonderful graphics on something. I found this graphic that I thought would look awesome on this end table. The Graphics Fairy has tons of FREE graphic for the taking, did you hear that, they are FREE! I also searched her blog for some instructions on how to transfer these babies with ease and you can find that here.  I needed to make the image bigger so I used her advise on that also by going to this site http://www.blockposters.com/ to make the image the size that I needed.  It was really easy, and I did it all by myself, I was so proud!  I used the transfer method where you use a pastel to scribble on the back side of your copy. I taped it down on my piece and traced the image on.  In the tutorial they suggested using a pastel, which I did have, but if you don't have any pastels,  I don't know why a crayon would not work.  Since the top was black I used a piece of chalk to get the outline of the shield traced on first, and painted the shield a creamy white, then used the pastel on the rest of it to transferred it onto the white shield.
chalk outline
Pastel scribbles
Be sure and check to make sure it is all transferring.  Oopps, I need some more  pastel there.

Using various sized paint pens I filled in the lettering
Here is the top finished:


The end table in my room:


This is my comfy lounge, blogging spot with my laptop
Fancy little knobs I had laying around.  Sprayed them with a metallic charcoal grey and then Painted the center (wood) part with that creamy white and used the paint pen to make the hash marks.


Since this guy had that "stinking" problem, before I painted it, I washed it down really, really well, and then sealed it on the underside of the  top and underneath, and inside the drawer with a poly spray-on, just to be on the safe side.  My biggest fan said I was NOT bringing that thing in the house if it remotely had any remaining stink to it! I primed it with black, painted on the teal, distressed it a bit,  glazed it with a watered down black paint,  and then  used paste  wax all over. What do you think?

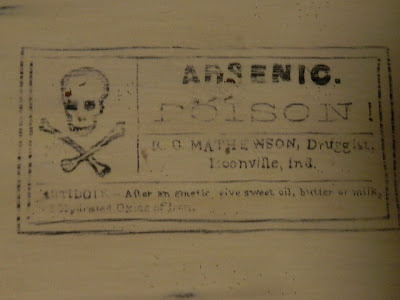
POISON, BOONVILLE, IN  TABLE

Here is another little project I was working on at the same time.  This graphic was also on the Graphics Fairy blog.  I thought it was a hoot and just had to use it somewhere.  Booneville, IN is just a few miles down the road from where I live.  I believe I read on that post that "The Graphics Fairy", herself, used to live right down the road from me in Boonville, IN!  I should message her about that! (note to self)

I had this piece of wood lying around.  I think it was a shelf at one time.  Found it AND the base of this little table at my favorite junk shop. I think I paid a whole $2.50 for both the of them.  So here it is:

This


Plus This


Equals THIS


The top

Distressed
Before Distressing - I kinda messed up on the "S", so needed to do some distressing  to hide that little  bitty mistake!
So what do you think of my little  BOONVILLE, IN POISON table??

Thanks for looking, came back often, to see what I have been up to!  I have been busy working on the two side chairs that I bought at my favorite junk shop.  They are almost done!

I love your comments, so keep them coming!

Partying at:


The Graphics Fairy
Brag Monday Party


Photobucket

Piece of Work Wednesday
Decorating Insanity

Monday, February 13, 2012

Linky Party

Share something you've done recently.  Take a moment to look at and comment on someone else's link - we're all in this together!  Please consider becoming a follower of Re-deFIND, I would love to have you as a follower!  Please join in the fun!

Friday, February 10, 2012

Beautiful in Black (Arm Chair)

This nice arm chair came from my favorite junk shop, and it was really in need of some LOVE!  I was so excited when I found it,  I didn't look it over too well.  I just wanted to make sure it was not wobbly. I really need to curb my enthusiasm, until I give things a good once over, because there was a couple of slight flaws.  Evidently some one had tried to give it some LOVE before me, and did a pretty good job of making it sturdy. It wasn't a bit wobbly, due to the  nice "fix-it" job on the bottom rung. Here is the before.

This is the seat that came with it. It did not fit right, that was Flaw #1
 Can you see flaw #2?  The two bottom rungs did not match!  One was just a DOWEL ROD! What the...? I had to come up with a plan......

Instead of trying to hide it ( which probably wasn't going to happen), I decided to make it stand out.
Chair Rung (AKA DOWEL ROD)

 Here it is after some sanding and a new paint job, with my homemade flat black chalk paint.
I cut that new seat for this guy, the one that it came with was pretty nasty, and I really did not want to try to fix it or even touch it! It went straight to the trash.   I am kinda thinkin' this wasn't even the same type of  seat that was original to this chair.  It may have been rush or leather, because the new one still doesn't want to fit right, but  it's better than the one it came with.    I may have to do some more work on it now that I see the close up pictures.  Anyway, here it is all dressed up.

Nice chunky legs!

(The fabric was a great deal at the Auction House, BTW)

I accented the little balls on top with  red to tie in with the seat fabric and "the stand out"  dowel rod, Ahemm,  Rung.
It is almost as CUTE as my Grandson in the picture above it!  Don't you think?

Thanks for looking!  I like comments, they make me ;)

Partying this week at:

Funky Junk's Saturday Nite Special

Sunday, February 5, 2012

DIY Wrought Iron Bed

A Sneak Peek

This bed took about a year in the making, but I had a lot of help from other sources and "my biggest fan"!  I saw a similar bed on the web and  I decided this was"my style" and I had to have it.  After much discussion with "my biggest fan" about how we could make this, we decided that that we would make  the bedposts in out of  wood not the small round metal posts in the original picture that I saw. "My biggest fan"  had a friend here in town that did metal work, so we showed him the picture of our design to see if he could possibly do this, he said that he thought he could and to let him know when we were ready for him to start.  After much more discussion about the bed posts, shopping for the right size and height of the posts that we wanted, we were not able to find what we wanted in any hardware store in the vicinity. So the project got put on the shelf again for several months.  One day a regular customers at my Hair Salon came in, and guess what he has a wood milling business!  So I asked him if he could make the post to our size specifications.  He said that he probably could,  as soon as I got home I told "my biggest fan" and he finally  went out to milling business and  got the ball rolling!  Yeah!  When we received the posts they sat in the garage a while longer.  Finally, I got "my biggest fan" to make another visit to the metal working guy.  His name is Kenny Jones, and he is an amazing artist, fabrication guy.  He had the same vision as we did.  We got the steel ordered and  he sent us pictures as his work progress, we made several trips to his shop to make sure we approved of what he was doing, the dimensions, the design, etc. Let me just say, that we had one of the hottest summers on record, and making all the scrolls out of the steel  took a lot of  strength, determination, and sweat!  I think he had to get a couple of friends to help while making the scrolls, they were all bent by hand, and a torch I think.  Several times the  guys discussed powder coating the whole thing.  I really didn't know what that was, I had pictured in my mind this black shiny stuff.  It took some more arguing  discussion over that one.  I had envisioned this raw steel look, that I thought would look great. After showing me all the colors that the powder coating came in, I agreed to a rusty burnt orange color, I still wasn't sold on it, until I saw it finished! "My biggest fan" worked diligently on his days off  work to cut, sand, and  varnish the posts.  He did a wonderful job, they are smooth as glass.  He also was the brains behind how it would all fit together, and BTW he did an amazing job on that too.  When it was finally time to put it all together, it fit perfectly, not even one hitch!  Originally I had Kenny make some finials for the bed posts that were different from what you see in the pictures.  I know he worked really hard on those finials, bending that steel in the little curly claws, but I just couldn't come up with a plan for the "something" I was going to make to put in them, be it ceramic balls, or glass, glass mosaic balls, I just couldn't see it.  One day my friend Kim at the Auction House gave me a whole box of these large balls, not sure what they were made of, they were not wood, or ceramic, plaster of paris,  maybe, I don't know,  they had "made in Indonesia" or something like that on them.  She said "here, maybe you can do something with these, I don't know what the He$$ they are".  So then my brain got to working. "my biggest fan" drilled some holes in them, and I paired them with a smaller wooden ball and a little round spacer thingy, mixed some paint to match the power coat, and I had myself some finials!  "My biggest fan"  said they looked like brown snowmen!  How dare he!  I liked them and that was my physical contribution to the project other than the idea, of course.  I also made the  flower pillows on the bed, picked out the curtains, painted the walls and the crown molding.  This is one half of the room, not too sure about the other side of the room, still thinking working on that.  So here it is, see if you like it.
Little Brown Snowmen
Romantic Lighting
Dalila design Curtains
Curtains from JC Penney
My "Tuffet" at my Vanity
Funky Feet on my "Tuffet"
 My "Tuffet" was one of those old round ottoman's covered in white Naugahyde (you know you seen them, Ugg) I covered it with the same fabric as the big pillows on the bed, then I added the feet underneath to make it a little taller.  If you have ever toren one of the ottomans apart, all they are is some type of straw like fiber, i am not sure if there is anything solid in the whole thing, so I had to make a base for the feet, and that is a  another story.......

Wrought Iron bed fabrication:  Kenny Jones, Elite Fabrication in Santa Claus, IN
Wood Posts milled by Tim Waninger: American Woodland Enterprises, Dale, IN
Powder Coating by :
The brains behind the logistics of putting it all together, and finishing the posts, "my biggest fan": Mike Fazio
 Brown Snowman maker, Design and most importantly Main Motivator:  Me!

How do you like the Bedroom so far?

Thanks for looking, Your comments make me smile ;)

Kathy

Partying at:


Sumo's Sweet StuffThe DIY Show Off UndertheTableandDreaming


Furniture Feature Fridays


Photobucket


Photobucket
DIY WROUGHT IRON BED WAS FEATURED !!!!!!


UndertheTableandDreaming