Sunday, May 20, 2012

Re-decorated Deck

It happened this fall.  We kept putting off taking down the fabric gazebo on our deck.  The weather had been so nice, I didn't want to put it away.  It was also the third year for this gazebo, and I was sure that with the weather and sun, it was not long for this world.  I heard a storm brewing one night, a lot of wind, and some clinking and clanking out on the deck.  This is what I woke up to!

My gazebo was done for, the wind had ripped it and torn it off the frame.  

This spring whilst talking to my "biggest fan" about getting a new one, he came up with the idea of building me a pergola!  Wow!  I was really happy that he was  think in the direction of something more permanent, but I wasn't too keen on the pergola.  Pergola's are beautiful and it would have really looked nice, but I really want something to shade from the sun.  The deck faces the West, and even though we are surrounded by large trees, the sun can be relentless here in Southern Indiana,  and frankly it is just no fun being on this deck with no shelter.  My biggest fan was not too excited about my idea of a regular roof, covered with corrugated metal.  He said he didn't want it to look like "Chicken Coop", what?  I assured him that it would not look like a chicken coop.  So after much figuring and sypherin' (his words) he came up with a plan.


This is just after the project started, the railing needed to be taking off.  By the way "my biggest fan" built this deck shortly after we build the house, and he did a pretty darn good job.\


Frame is going up!  Oh, I was so excited!   Our good friend Scott Helped get this part done!  Thank you Scott!

Since I was getting the new addition to my deck, I could put my old faded patio table and chairs back they way they were, soooooooo

I found this old swing at a favorite junk shop, so I drug it home.

Oh, but look at it now!


I covered the seats in this green stripped fabric, and made a pillow for necks during star gazing and
 chill-axing!

The cushions on my patio chairs were so faded from the sun, I looked into some new ones, but boy are they proud of those puppies!  No way was I paying those kind of prices, I could buy a new Patio set for that.  I couldn't find any the right shape for the backs of my chairs anyway, so I just decided to cover them.  It was really easy, I just made a sack for the cushions.  I sewed some ribbons at the opens to tie them shut and to tie them onto the chairs.  It was about $80 for the fabric, but waaaaaaay cheaper than new ones.  I think they look quite nice!


I found these grass rugs at Tree's and Trends for $10 each!  I was going to paint a border, but I think I like them just like this!  (it is a lot less work too)

This is another re-store find.  Doesn't every deck have a chandelier?  It was old and had very old wiring, so I took out all the guts, took it all apart, spray painted it this pretty green, and then TRIED to put it back together.  NOTE TO SELF:  take pictures of chandelier's before you take them apart.  I worked on that *%*($(# thing about an hour and a half, trying to figure out how it went back together, until I was ready to throw it OVER the deck!  Thankfully, "my biggest fan" came along and put it back together for me.  Still not sure if is right, but it is WAY better than I had it.  We only had a few parts left over! See my new roof above it?

I am going to put candles in the little cups for those candle light dinners or Wine parties!

Here are some more pictures!  

My oldest son made this chair for me when he was in High School.  One of these days I am going to make a foot stool for it. I spray painted it white, I believe it had a redwood stain on it before.

My grandson's little space.


My flowers are starting to grow!


I love my new Deck.  I have already spent more time out here in the last few weeks than I did all last year!!!


A big THANK YOU to my "biggest fan"  you inspire me!

I also think I need to have some girlfriends over for a Wine Party!  Any takers?

Thanks for looking!

K


Sunday, April 29, 2012

Re-Invented Antique Cabinet

I have had this Antique Cabinet for a few years, but I had it on top of a counter top that was in my Laundry Room until I redecorated it.  You can see that makeover here.  I was wanted to hang it on the wall in the Laundry Room, but it was too wide for the space, and was not going to fit.  The backing of it was probably not going to be strong enough to use it to support the cabinet on the wall  anyway, so I decided that I would try to find something to sit it on.  I went to may favorite junk shop, and found this old piano bench. It was the right width and length, so I thought this just might work! It was not in the greatest shape, so I had to tweak it  a bit.


I decided to remove the top of the bench, because it was warped a bit and the veneer was chipping up.  Luckily I had a piece of MDF that was just the right width, but was a little too long.   My "Biggest Fan" wanted to help, so he cut it off with power tools (I don't think he trusts me with the circular saw yet).  I had to "sturdy up" the bench a bit so I added some bracing on the inside of the bench. The bottom was in pretty bad shape too, so I just took it out.

I cut those pieces of 2x4 all by my self on my compound miter saw, and then screwed them onto the the two pieces of wood that was supporting the bottom of the bench.

The Cabinet was already painted white, but I painted it so long ago I wasn't sure if I still had that can of paint any more, let alone, remember which one it was.  I wanted the top and the bottom to match so I repainted the cabinet.  Here is the before.  I almost forgot to take a picture, and I already had the doors off and the glass taped up.


The piece of MDF board that I cut for the top of the bench seemed kinda raw on the edge so I found some 1/4 round and attached it to the edge of the MDF board with my "new best friend" the Pneumatic brad shooter thingy.  That was so simple, I mitered the edges too.  I was so proud of myself! I decided to paint the top in a bronze/brown color.  I mixed my own paint for this, a little brown a little powder metallic mica, and some glaze.  I painted the piano bench legs and sides in a white, same as the top, did a little distressing, glazed it with my favorite dark Jojoba stain then waxed it.  My "Biggest Fan"  helped me carry it into the house, we attached the pieces and WALLAH!!  What do you think?? Here is the finished cabinet!


I love this key hole - no key though


Don't you love this detailed opening?


I love this cabinet it has such pretty lines and details!  How about you??

Partying This week at: 

Furniture Feature Fridays


Sumo's Sweet Stuff

Monday, April 9, 2012

Twin Arm Chairs

I found these matching arm chairs at my favorite Junk shop a few months ago, thinking that will be a pretty easy upholstery job.  Well, I wouldn't say it was easy.  I think the hardest part was taking the 7,465 TACKS out!!! I am telling you, that is how many tacks that were in those suckers chairs....well, at least it seemed like there were that many.  The worst part was the "decorative" leather capped tacks on the outside.  While trying to lift the tack out, the cap would pop off and reveal this EVIL little two pronged tack, that the tack puller had nothing to hold onto to pull it out!  So I had to enlist the help of some needle nose pliers to pull out!  Whew!!!  I will think again before I pick another project like that!  The good thing was that the leather was so rotten that if I couldn't get the tacks out I could rip that leather off the tacks!  The Upholstery job was easy compared to  ripping the old stuff off.

Here  they are before:

The chairs the day I bought them.  That little shelf is another project


The first chair after it was stripped down.  I had tacks all over that floor!  My biggest fan says "You take your life in your own hands if you walk into that garage without shoes!".  It's always like that though, if it's not tacks it's glass shards!  Sorry honey!


the bottom of my shoes after taking the tacks out!


I was sure to take some pictures during the "de-tacking" so I could remember how to put it all back together!


I decided to paint the arms and legs black, as I had this awesome fabric that I scored at my friends auction house, Indiana Realty and Auction in Tell City, IN. BTW you can get some wonderful deals there!!! I love this Black Squiggly fabric. I also learned to use a new tool during this project!!!!  My biggest fan let me use his air compressor and that nifty little tack gun thingy to put them all back together, now that was the berries!


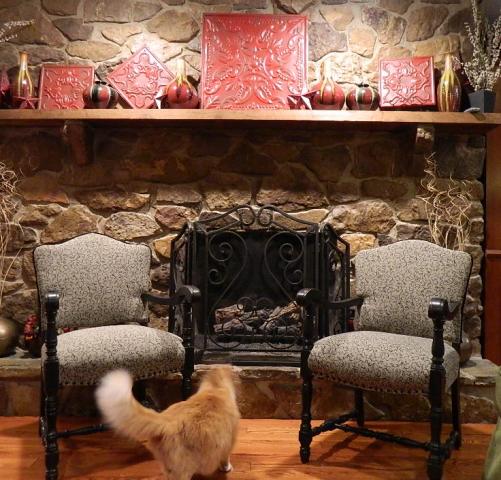
My friends cat decided to wonder in during the picture taking!

I used some wide gimp to cover the tacks on the back of the chair.  Originally there were decorative tacks, but I wanted to dress them up a bit more.

I wish I had a place for them in my house, but they will be for sale!!  These pictures were taken at my friend Susan's house in front on ONE of her beautiful fireplaces.

So what do you think?  Was it worth all the trouble with the tacks?  I guess it was, but it might be awhile before I pick another project like this!

Partying at:


Sumo's Sweet Stuff
/ Furniture Feature Fridays

Thursday, April 5, 2012

Chandelier in my New Laundry Room

It all started with the Chandelier I found at one of our local Re-Stores.  My biggest fan thought it was the gaudiest one there.  Of course that was a challenge to me!  I think they wanted $20 dollars for it, but we talked them down to $15 since it was missing several of the crystal drops.  After getting it home, I counted how many crystal drops there should be, it was 90!  The guy at the Re-Store told me that you can get $2.00 a piece at the flea market for those crystals!  Wow!  Hmmm,  no, I couldn't........  it was exactly  what I was looking for!  But there were not 90 crystals, there were several missing.  So I had to come up with a plan for the missing crystals.  I was sure I could come up with some beads or something.  Did I mention how nasty it was?  It was nassssy!!  Here is a picture of the crystals soaking in a bowl of WHITE vinegar.  Ewww!


This is the Chandelier before it was painted.


After painting it with the Black/Bronze Metallic Spray Paint,

This is the Chandelier after it was hung up in my Laundry Room

Isn't it AWESOME!!!


I Love the way it makes the shadows on the wall!


With the light off., you can see some of the beads I replaced the missing crystals with.  They are just a piece of wire with a crystal bead at the bottom and some small silver beads up the wire, easy peasy!

This is the little cabinet in the room before I painted it.  I believe it was suppose to be part of some type of Entertainment Center, it  looked brand new, but I don't think it was ever used.  I found it at my favorite junk shop for about $20 bucks.   I loved the wire inserts in the doors.


Here is the cabinet after a little Spray Paint, some black glaze and some furniture wax


I decided to put some fabric behind the wire mesh to hide my detergent and such.  I also added some little wood details in the top corners and the middle. The green basket on top hides my extra paper towels, they just fit, without showing over the top, and Dryer sheets fit perfectly in the little yellow boxes.

So here is the Finished Laundry Room!


We decided to stack the washer and dryer,  with the help of my biggest fan.... it was really easy.  He did a great job! I still owe him a favor for that one.  He helped hang the little cabinet too...thank goodness I measured correctly,  it fit perfectly.  I've been known to not always measure correctly... what's an inch or two... right???


Our Initials, I think I need an  &, but I haven't been able to find one of those, I may have to make one.....


We've had this little table for awhile, it was all stained, so for this project,  I painted the legs and bottom shelf white, sanded and waxed it.  I am not sure it is staying here, but I have not been able to find exactly what I want, so it will do for awhile.  Actually I think it looks pretty good here.  If only that basket would stay that way..... EMPTY!!!

So what do you think?


So what do you think of my Laundry room Make Over???

Ok, just wondering, does it look gaudy NOW??


Oooops!  I forgot to show you the before!  I painted the room this eggplant color when we first build this house, I loved it at the time, but it has been nearly 7 years, and it was showing a lot of wear and tear. Here was a shot after we moved the dryer out.


It was pretty dark and plain.  There was a piece of counter top sitting on top of the Washer and dryer.  I had a chance to get some help to move it and the dryer out, so I took it!  And didn't get a picture with it all in there.  Sometimes you have to seize the opportunity when it arises! 

I am so glad I am done with this project, I have been thinking about it for a long time, and we have been working on it for a couple of weeks.  Now on to the extra bath!

Thanks for looking! I love your comments, keep them coming.

Partying at:


Furniture Feature Fridays


Sumo's Sweet Stuff